
Cupolas are the miniature house-like structures that straddle the rooftop of houses and buildings. Cupolas are not just decorative, they can be functional as well. Before roof and ridge vents became commonplace, a cupola was the best way to provide ventilation to the house, barn, or garage that it was built upon. Cupola construction can be a rewarding project enhancing both utility and the attractiveness of a home or building.
Instructions
- 1
Cut the cedar 2-by-6's into 30-inch sections. These pieces will form rectangular frames at the bottom of the cupola structure for the sill, and at the top of the cupola for the soffit underneath the roof. Bevel four pieces for the sill using a table saw with the blade set at 19 degrees. Position the fence a 3/4-inch from the blade. Bevel four pieces for the soffit by setting the table saw blade at 45 degrees and the fence at 4-1/4 inches from the blade. Sand and miter the ends of each piece at a 45-degree angle. Save the scraps from the sill pieces and shave off a 1/4-inch piece and put aside.
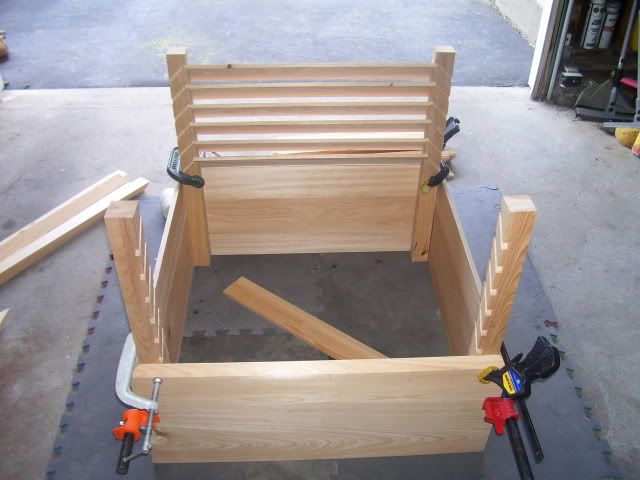
2Construct the sill and soffit frames. Connect each set of pieces together to form two rectangular frames. Ensure all corners are square and stable by screwing in plywood scraps on the underside of each frame.
3Cut the vertical pieces of the frame out of the cedar 4-by-4's. Cut four columns, 17- inches long. Attach the sill to the underside of the columns by drilling pilot holes and inserting 3-inch screws into each post and two on each side of the miter joint. Ensure the corners of the sill and the columns are aligned.
4Nail the scraps of sill you saved onto the sill frame. Apply construction adhesive and let dry. Drill the brick mold frames in between the posts. Before inserting the screws, pre-drill and countersink each hole. Adjust the position of the cupola columns to fit the top of the brick mold in place. Screw in the bottom and sides of the frames to the columns, and screw the top piece to the sides.
5Attach the louvred vents by screwing in place to the back sides of the brick mold frames. Use self-tapping sheet metal screws to install. Screw in the soffit frame to the top of the column pieces, repeating the process of installing the sill.
6Measure and cut one curved rafter from a 2-by-6 plank. Cut into a rhombus with curved sides, 5- 1/2 inches by 21- inches at the widest point. Mark and cut one rafter, then use it as a template to mark the other three. Fasten rafters together using a 6- 1/2-inch long piece of 2-by-2 wood as a central spindle. Screw the hub to two of the rafters, and fasten the other two with screws driven through the rafters and into the hub.
7Cut the 3/8-inch piece of plywood to a 26-by-26-inch square. Center the rafter structure over the plywood and screw in place from underneath. Position screws so they penetrate the plywood and into the base of each rafter. Cut a 12-inch diameter hole in the center of the plywood using a jigsaw. The hole will let water drain out of the cupola if necessary.
8Measure and cut remaining 3/8-inch plywood into curved triangles into sheathing pieces to fit over the rafter structure. Screw in place, beginning at the middle and inserting the screws at an angle. Leave a 1/2-inch gap between the plywood sheathing pieces. Center the roof over the vent structure and screw in place, driving screws upward through the soffit frame into the base of the roof.
9Attach the shingles. Begin with a full shingle nailed to the roof upside-down, known as a "starter strip." Let the starter strip overhang the plywood by 3/4-inch. Nail on the remaining shingles, leaving a gap between the shingles at the ridges. Glue bottom edges down with a drop of roofing cement.
10Finish shingling by nailing shingles across the ridges of the roof. Lay heavy lines of roofing cement along both sides of each roof ridge. Cut shingles 5- inches long, and cut the first shingle along each ridge to conform to the corner of the roof.
11Apply aluminum flashing to the roof cap. Cut a 9-by-14-inch piece of flashing around the peak of the roof. Hold in place and mark for cutting into a pyramid shape with neat, even edges. Cut the cap and attach on top of the roof with roofing cement. Drive one roofing nail through the side of the cap where the seam of the flashing lies.
12Measure the pitch of the roof. Lay two scrap boards over the ridge of the roof and screw them together securely, preserving the angle of the ridge.
13Make the roof saddle for installing the cupola from the 3/4-inch plywood. Cut four rectangular pieces to the dimensions of the vent structure, between 8 and 16- inches high depending on how steeply the roof is pitched. Use the roof-pitch gauge made to mark the correct pitch along two sides of the saddle. Place the point of the gauge in the middle of the saddle, about 4- inches from the top. Align the legs of the gauge with the inside edges of the saddle, and cut out the V-shaped notch. This notch is where the cupola will straddle the roof ridge.
14Cover the saddle with flashing and fasten the seam in place with self-tapping screws. Crease the flashing at the corners with a hammer and block of wood for smoothing. Fold down the overhanging flashing along the top and bottom, and cut the flashing at the V-shaped notch. Fold the flaps of flashing into the saddle and secure the flaps with screws.
15Fasten the saddle to the roof. Lay roofing cement to each sloped side of the saddle attached to the roof. Fold down the four flaps of flashing onto the cement. Drive 2-inch screws through the flashing and attach to the saddle and on to the roof. Make two small 2-by-2 lumber strips or cleats. Attach the cleats to the inside edges of the saddle so that they are angled against the slope of the roof on either side, like the peak of a triangle. Screw the cleats to the roof. Seal any gapping at the edges with roofing cement. Caulk around the upper edge of the saddle, but leave the two lowermost edges of the saddle unsealed. This allows any water that penetrates the cupola to drain out.
The RunnerDuck Cupola, step by step instructions.
www.runnerduck.com/cupola.htmThe Cupola project, is a step by step instruction on how to build a coupla.
Cupolas, Weathervanes, Finials and Vinyl Cupolas for Barns &
www.countrycupolasandweathervanes.comCupolas for sale made of wood, copper, and vinyl. Cupola plans available for barns, sheds, gazebos & homes. Also offering copper weathervanes & finials.
How to Build a Cupola: The Family Handyman
www.familyhandyman.com Parts of the House RoofWhen I decided to build a cupola to dress up my bland garage, I began by taking a walk. Most of the cupolas in my neighborhood are purely decorative.
HOMETIME HOW TO Garages - Roofing and Cupola
www.hometime.com/Howto/projects/garage/garage_5.htmRoofing and Cupola. We used 4x8 oriented strand board sheets as roof sheathing. As you nail the sheathing panels, stagger the vertical seams between rows for added ...
How to Build a Wood Cupola DoItYourself.com
www.doityourself.com Roofing Roof ConstructionWhy not try building your very own wood cupola to add elegance and style to your home? Wood cupolas are usually placed on rooftops of barns or some garages.
How to Design a Barn Cupola eHow
www.ehow.com Building & Remodeling Exterior RemodelingHow to Design a Barn Cupola. The cupola is an architectural feature appearing in architectural styles from Greek and Roman to Islamic. Cupolas are a roof focal point ...
EzineArticles - How to Choose the Size of Cupola to Create Curb
ezinearticles.com Home ImprovementApr 18, 2009 When thinking about purchasing a cupola, be careful not to purchase one without considering the size. Taking a few minutes to measure the roofline is ...
EzineArticles - How to Build a Brick Outdoor Grill
ezinearticles.com Landscaping Outdoor DecoratingJun 16, 2009 Are you trying to figure out just how to build a brick outdoor grill? It isn't as complicated as you may think. All you need is a little preparation a lot ...
How to Build a Cupola eHow
www.ehow.com Building & Remodeling Exterior RemodelingHow to Build a Cupola. Cupolas were used in the days before roof vents to provide ventilation for barns, stables and houses. They are the square, vented structures on ...
Cupola Installation : How to install your cupola - YouTube
www.youtube.com/watch?v=f-uZWYqazmIStep-by-step instructions for installing your cupola. Visit HGLifestyle.com for our selection of beautifully designed cupolas for your home roof or barn ...


0 komentar:
Posting Komentar